Installer Active Directory på Windows Server 2016.
BEMÆRK: Before installing the AD role, you must install the DNS role. (DNS – required component for AD)
Install Active Directory Domain Services with Graphical Interface (GUI)
1. Start your Server and start the Server Manager konsol (by default starts after user login);
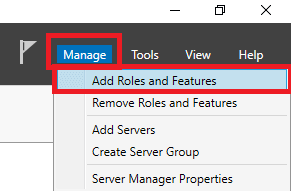
2. Click Manage (øverste menu) og klik Tilføj roller og funktioner;
3. Klik the Next knap;
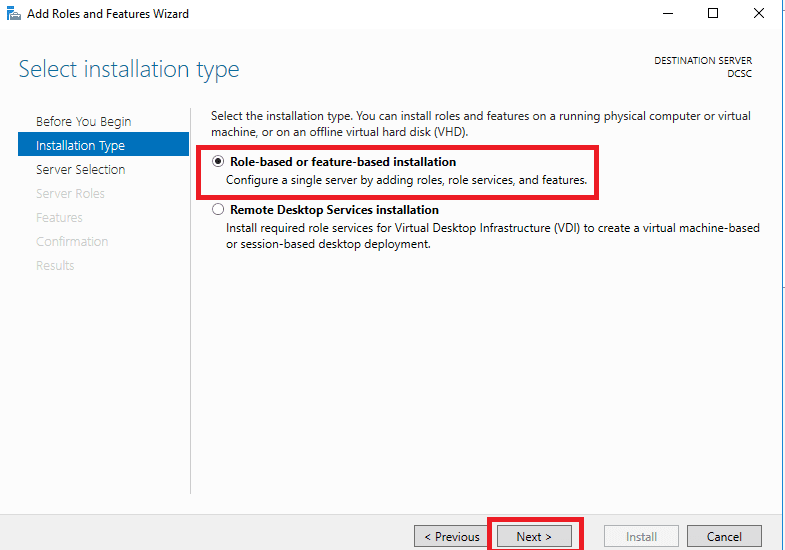
4. Vælg Rollebaseret eller funktionsbaseret installation og klik Næste knap;
5. Vælg din målserver (in my case it’s only one) og klik på Næste knap;
6. Sæt flueben Active Directory Domain Services (ADDS);

7. Klik på i pop op-vinduet Tilføj funktioner knap (added some AD management tools);

8. Klik Næste knap;

9. For now we don’t need any Funktioner, so click Næste;

10. Read the short text about AD and click the Næste knap;
11. You may set a check mark Restart the destination server automatically if required (by default not required). Klik på Installere knap;
12. After installation is complete click the Tæt knap;
13. After role installation is complete you will see a yellow triangle in the upper menu. Click on it to show the next list, klik Promote this server to a domain controller (to make this device Domain Controller, aka DC);

14. Vælg Add a new forest (in my case this is a new DC and new forest), and enter the Root domain name (this is our future domain). Klik på Næste knap;

15. Vælg din:
- Forest functional level;
- Domain functional level;
Type the DSRM password (make it strong, needed for future restore if it fell) og klik the Next knap;

16. If you have parent DNS click Show more;
17. Read the short text about DNS delegation and click the OK button.If needed- create a DNS delegation. If you don’t need to Create DNS delegation (som et eksempel) – click the Next knap;

18. Gå ind The NetBIOS domain name of your domain and click the Next knap;
19. If need – specify the location of AD DS objects, og klik på Næste knap;
20. Read the summary information, and if all is OK click the Next knap;
21. After checking pre-requirements click Installere;

22. Installation began;
23. After installation is complete you get a pop-up about Signing out and the system restarting. You may click the Tæt button or wait to restart;
24. System restart;
25. After restarting you will see, that you are able to log in as Domain Administrator;
26. After login to the system, when the Server Manager console shows up you will see the installed role AD DS;

Install Active Directory Domain Services with Windows Powershell
The first thing you will need to do is open Windows PowerShell. Once you have logged into the system and are faced with the command line, simply type PowerShell (in Windows Core). For the desktop interface run PowerShell (Admin).
1. Udfør:
Get-WindowsFeature2. Once the command has been completed successfully, you will be presented with all the uninstalled, but available, modules.
3. Once we have figured out the service name and the module name, we now have to go ahead and install it.
Install-WindowsFeature AD-Domain-ServicesThis command will extract all required binary files and start the installation procedure.
4. Let’s create a new forest.
Import-Module ADDSDeploymentBEMÆRK: If the command is completed successfully then you will be faced with a blank prompt.
5. Nu, you will need need to promote your server to a domain controller as per your requirements – there are several commands that you can use to do this.
| Command | Beskrivelse |
| Add-ADDSReadOnlyDomainControllerAccount | Install a read-only domain controller |
| Install-ADDSDomain | Install the first domain controller in a child or tree domain |
| Install-ADDSDomainController | Install an additional domain controller in a domain |
| Install-ADDSForest | Install the first domain controller in the new forest |
| Test-ADDSDomainControllerInstallation | Verify prerequisites to install an additional domain controller in a domain |
| Test-ADDSDomainControllerUninstallation | Uninstall AD services from the server |
| Test-ADDSDomainInstallation | Verify prerequisites to install the first domain controller in a child or tree domain |
| Test-ADDSForestInstallation | Install the first domain controller in the new forest |
| Test-ADDSReadOnlyDomainControllAccountCreation | Verify prerequisites to install a read-only domain controller |
| Uninstall-ADDSDomainController | Uninstall the domain controller from the server |
To install the Active Directory with the default configuration, execute the following command:
Install-ADDSForestThis will install the basic features and functions, imidlertid, if you want to install a customized setup:
Install-ADDSForest
 -CreateDnsDelegation:$false
 -DatabasePath “C:\Windows\NTDS”
 -DomainMode “Win2012R2”
 -DomainName “yourdomain.com”
 -DomainNetbiosName “YOURDOMAIN”
 -ForestMode “Win2016”
 -InstallDns:$true
 -LogPath “C:\Windows\NTDS”
 -NoRebootOnCompletion:$false
 -SysvolPath “C:\Windows\SYSVOL”
 -Force:$true
Once you execute this, you will be asked to enter SafeModeAdministratorPassword – this is for the Directory Services Restore Mode (DSRM). Once you set this password here Windows will finish the AD installation and configuration on your Windows Server based on the input provided.
6. The Active Directory will now install. You may receive various warnings, depending on whether you have static IPs or not. Your server may automatically restart during this process as well.


awsome